Hidden Hidden Hidden Hidden


SCRIPT REFERENCE
SOFTWARE > INSTRUNET WORLD PLUS SOFTWARE (iW+) >

Table Of Contents

Script Page Reference

Different Types of Scripts


Script Page Reference

The Script Page
Scripts are developed in the Script page, shown below, which is enabled by pressing the Script tab at the bottom of the instruNet World window.

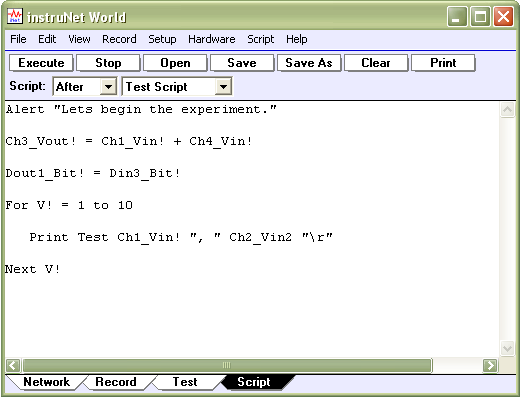
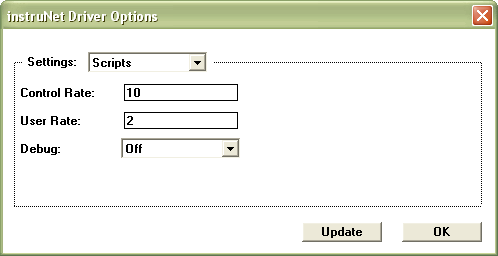
All script code is automatically saved inside a .prf instrument file when one presses the Network page Save button or selects Save Setup in the Setup menu. The Script page contains a text editor that supports typing, placing an insertion point, scrolling vertically, selecting text, cutting text to the clipboard, copying text to the clipboard, and pasting text from the clipboard. The text editor is used to create, edit, view, execute, and test instruNet Scripts. The currently viewed script is specified with popup menus at the top of the window (e.g. After Select Page Record script), as illustrated below.

The Execute button runs the current script, the Stop button stops any currently executing script, the Save/Save As buttons save the current script to disk in a text file, the Open button loads a text file into the current script, the Clear button clears the current script, and the Print button prints the current script to a hardcopy printer. For a description of script types, click here. For a description of buttons and menu commands that aid in the programming process, click here.

Script Options Dialog box
The Script Options dialog box, shown below, enables one to view and adjust the Control Rate, the User Rate, and the Debug On/Off status. To open this dialog, select Script Options in the Script menu. In summary, the Control Rate is the executions per second rate at which the Control Calculate and Control Scripts execute; the User Rate is the executions per second rate at which the Panel Meters and User Scripts execute; and the Debug field controls the printing of debug text to the text page. For details on the maximum User and Control rates, click here.

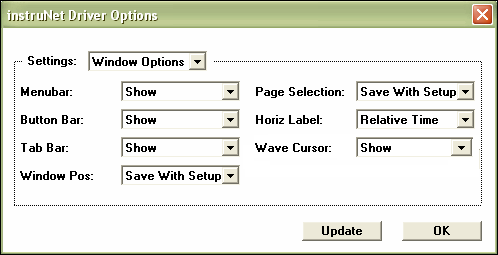
Window Options Dialog box
The Window Options dialog, shown below, enables one to:

  • Show/hide the menu bar at the top of the window.
  • Show/hide the tab bar at the bottom of the window.
  • Show/hide the button bar below the menu bar.
  • Save or not save the window position & size within the .prf instrument file.
  • Save or not save the page selection within the .prf instrument file.
  • Control the Record display horizontal timescale (i.e. to show relative time, or absolute day time).
  • Show/hide the waveform cursor readout in upper right corner of Record page.

To open this dialog, select Window Options in the Setup menu. The menu bar at the top of the window and the tab bars at the bottom of the window are sometimes hidden to reduce the number of options available to the instrument operator. Alternatively, one can hide the Tab Bar at the bottom and the Button Bar at the top to create more space, and rely entirely on the Menu Bar. To show the menu bar after hiding it, one can press keys CONTROL SHIFT 'M'. If one saves the Page Selection with the .prf file, then the page that is selected (e.g. Record) when one saves the .prf file is automatically loaded when one opens that file. If one saves the Window Position with the .prf file, then the Window position and size is restored when one loads the .prf file.

Horizontal Timescale - Time of Day or Absolute Time
The Horizontal Label field allows one to show either Relative time or Time of Day in the Record page horizontal timescale, as illustrated below. Relative time shows the number of seconds since starting the digitization at 0 seconds. Time of Day shows the time of day, as known by the computer's clock. For example, if you start digitizing at 1:05 am on Feb 1, 2003, it will show "0117, 2/1/03" 12 minutes later. Post-Acquisition, one can change this field to view the data with either timescale format. Displaying Time of Day requires instruNet World PLUS (iW+).

Time Relative to start of digitization, left edge corresponds to 0 sec.

Time of Day, e.g. first grid corresponds to June 11, 2003, 6:12pm + 31 seconds


Different Types of Scripts

The typical iW+ instrument includes many different independent scripts. For example, one line of script code in a channel's Control Calculate field defines an analog or digital output channel as a function of other channels or mathematical functions (i.e. waveform generation or feedback/control); or one line of script code in a channel's Panel Meter Calculate field mathematically calculates a numeric representation of that channel to be displayed in the main window. In addition to the Control and Panel Meter calculate fields, many scripts are accessed in the Script page, after being selected in the upper-popup menus within that page, illustrated below.

For information on how one script can run another script click here. The different types of scripts are described below:

Panel Meter Calculate Field
Calculates displayed Panel Meter value at the User Rate (e.g. every .5secs). For details, click here.

Control Calculate Field
The Control Calculate field contains one line of script code that mathematically defines an analog or digital output channel in real-time using script functions and the values of other channels. These are processed at the rate (updates-per-second) specified in the Script Options dialog Control Rate field, which is accessed by selecting Script Options in Script menu. To view/adjust the Control Calculate field for a specific channel, as illustrated below, select that channel in the Channel Options submenu within the Hardware menu, and then select Control in the Settings submenu within the Channel Options dialog.

Related Topics: Control and Waveform Generation discussion, Working with instruNet Hardware discussion, Output Waveforms that are defined with Mathematical Equations example, Feedback/Control Loop example.

The Control Script (i.e. execute every x seconds while digitizing)
The Control Script executes while digitizing, at the Control rate. More specifically, at each control event, the Before Control Event script executes, followed by all enabled channel Control Calculate fields, in channel order, followed by the After Control Event script. Control events execute at the Control Rate, which is viewed and edited, in units of executions-per-second, after selecting Script Options in the Script menu. If you want a script that executes periodically (e.g. every .1 seconds), independent of whether or not you are digitizing, please refer to the User Script, described below. For details on the maximum User and Control rates, click here.

One can drive an output channel with its Control Calculate field, or with a line of code in the Before/After Control Script. The advantage of the Control Script is one can calculate an output value with multiple lines of script code (e.g. via "if ... then ... else"). To view/adjust the Control Script, select the Script page (i.e. click Script tab), and then select After Control Event or Before Control Event in the upper popup menus. The Control Script is disabled from executing when the Script page is selected, so it will not run while you are typing in it.

Related Topics: Control and Waveform Generation discussion, Working with instruNet Hardware discussion, Output Waveforms that are defined with Mathematical Equations example, Feedback/Control Loop example.

The User Script (i.e. execute every y seconds at all times)
The User Script is similar to the Control Script, except it executes at all times (i.e. digitizing on and off) at the User Rate (e.g. 0.1 to 10 times a second). More specifically, at each user event, the Before User Event script executes, followed by all non-hidden Panel Meters, in channel order, followed by the After User Event script. User events execute at the user rate, which is viewed and edited, in units of executions-per-second, after selecting Script Options in the Script menu. If you want a script that executes only while digitizing, please refer to the Control Script, described above. To view/adjust the User Script, select the Script page (i.e. click Script tab), and then select After User Event or Before User Event in the upper popup menus. The User Script is disabled from executing when the Script page is selected, to aid in the development of itself. For details on the maximum User and Control rates, click here.

The Test Script
The Test Script is not invoked by any action other than the Script page Execute button; consequently, it is used to develop and run script files. For example, one might load a script from disk (i.e. via the Script page Open button) that sets up several channels, execute that script (i.e. via the Script page Execute button), and then save the resulting .prf instrument file with the set up channels via the Network page Save As button. To view/adjust the Test script, select the Script page (i.e. click Script tab), and then select Test Script in the upper popup menus.

The Scan Script
There are two Scan scripts, one that executes before each digitized scan and the other that executes after each digitizing scan. Recall that a "scan" is one RAM buffers worth of data. For details on scans, please refer to the Digitizing Analog Signals into the Computer. To view/adjust the Scan script, select the Script page (i.e. click Script tab), and then select After Each Scan or Before Each Scan in the upper popup menus.

The Digitization Script
There are two Digitization scripts, one that executes before each digitization (e.g. when the Start button is pressed), and the other that executes after each digitization (e.g. when digitizing ends due to finishing the last scan, or when the Stop button is pressed). In review, a digitization involves digitizing a specific number of scans, at a specific sample rate, with a specific number of points per scan; where all of these parameters are set in the Record Setup dialog which is accessed by selecting Record Options in the Record menu. To view/adjust the Digitization script, select the Script page (i.e. click Script tab), and then select After Digitization or Before Digitization in the upper Popup Menus.

The Load Settings Script
There are two Load Settings scripts, one that executes before one loads a .prf file (i.e. a moment after pressing Network page Open button, yet before the actual open takes place), and one that executes After one loads a .prf Instrument file (i.e. after loading the channel settings stored in the .prf file). Since all current scripts are deleted when one starts to load a .prf file, the After Load Settings script must be contained within the script that is being loaded. To view/adjust the Load Settings script, select the Script page (i.e. click Script tab), and then select After Load Settings or Before Load Settings in the upper popup menus.

The Script Engine Script
There are two Script Engine scripts types, called Before Script Engine and After Script Engine. The Before Script Engine executes right after the engine is initialized and After Script Engine executes after the script engine is reset. The Before Script Engine script is useful at initializing variables (e.g. v! = 0) before they are read (e.g. print (v!)). For details on script engine initialization and reset click here. To view/adjust the Script Engine script, select the Script page (i.e. click Script tab), and then select After Script Engine or Before Script Engine in the upper popup menus.

The Exit Program Script
The Exit Program script executes after one exitâs the instruNet world application program (i.e. a moment after selecting Exit in the File menu, yet before the actual closing of the window). To view/adjust the Exit Program script, select the Script page (i.e. click Script tab), and then select After Exit Program in the upper popup menus.

The Select Page Script
The Select Page script executes when a specific page is selected (e.g. after the user presses a page tab at the bottom of the window). The After/Before popup specifies if the script executes before the new page is drawn, or after. For example, one might want a script to execute after the user presses the Record tab and after the Record page is drawn. To view/adjust a Select Page script, select the Script page (click Script tab), select the Select Page in the upper popup menus, select Before or After, and then select a specific page in the right-most upper popup menu.

The Press Button Script
The Press Button script executes when a button is clicked (e.g. after the user presses the Start button in the Record page). This button could be a standard button (e.g. Record page Start button), or a User Defined Button. The After/Before popup specifies if the script executes before the button's action is taken, or after. For example, Before Record Save executes a moment before the save dialog appears, and After Record Save executes a moment after the files are actually saved. To view/adjust a button's script, click here.